
Hardscaping on a Budget: Paths, Patios, and Borders Without a Landscaper
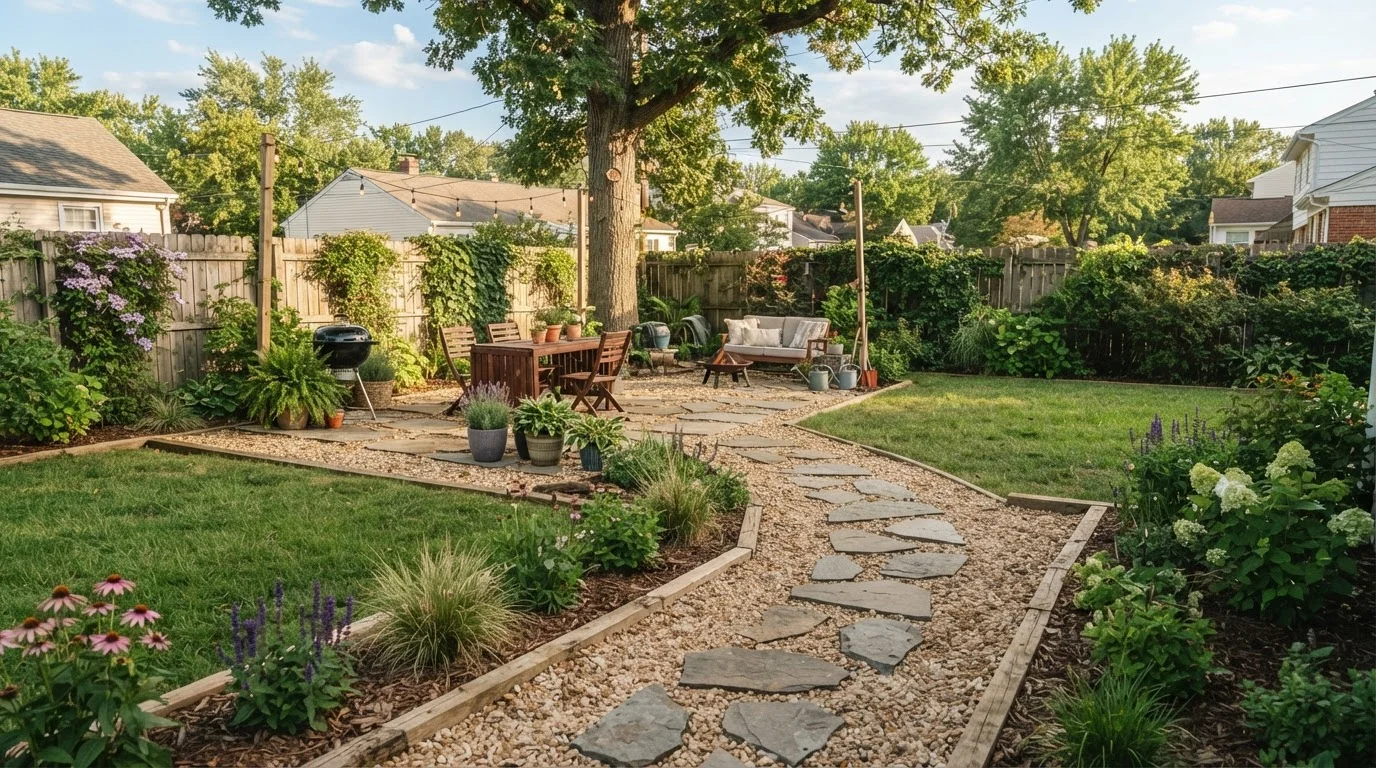
Photo credit: ResultsRover.com | Insights You Can Trust
In this article
Gravel paths, stepping stones, and simple borders can transform a yard without professional help. Learn planning basics and realistic expectations.
Key Takeaways
- Gravel, stepping stones, and concrete pavers are the most cost-effective hardscaping materials for DIYers.
- Proper planning and layout on paper before breaking ground prevents expensive mistakes.
- Landscape fabric under gravel paths significantly reduces long-term weed maintenance.
- Most simple paths and borders do not require permits, but always verify with your local municipality.
- Starting with one small project builds skills and confidence before tackling a full patio.
Why DIY Hardscaping Is Within Reach for Most Homeowners
Hardscaping - the non-plant elements of a landscape, including paths, patios, edging, and retaining features - is often assumed to require professional installation. In reality, the most commonly used residential hardscaping projects involve basic excavation, compacted bases, and surface materials that experienced DIYers and motivated beginners alike can handle with standard tools and a weekend or two of effort.
The cost difference is substantial. Professional landscaping labor can add hundreds to thousands of dollars to a project that, in materials alone, might cost a few hundred dollars. That gap represents real savings - money that can go toward plants, furniture, or the next yard improvement.
That said, realistic expectations matter. Simple gravel paths and mortarless stepping stone layouts are genuinely beginner-friendly. A large mortared flagstone patio or a structural retaining wall (anything over roughly 4 feet tall) typically requires professional expertise, permits, and engineering considerations. This guide focuses squarely on the approachable end of the spectrum.
Rent Equipment Instead of Buying
A plate compactor, sod cutter, or hand tamper can be rented from most home improvement centers by the day at a fraction of the purchase price. For a one-time project, renting makes far more financial sense. Factor rental costs into your budget estimate early so there are no surprises.
If you want to understand how to slot this project into a broader household plan, our budgeting basics guide covers practical ways to track and allocate home improvement spending.
Choosing Materials That Match Your Budget and Skill Level
Material choice is the single biggest lever on both cost and difficulty. Here's a practical breakdown:
- Pea gravel and crushed stone - among the least expensive options per square foot, easy to install, and forgiving if the base isn't perfectly level. Crushed stone compacts better and is more stable underfoot; pea gravel shifts more but is softer and quieter.
- Concrete stepping stones - individually manageable, widely available, and straightforward to set. A stepping stone path requires far less base preparation than a full patio surface.
- Concrete pavers - modular, durable, and repairable (you can lift and reset individual units). A mortarless dry-set paver patio is the most ambitious project covered in this guide and requires careful base preparation, but the results are long-lasting.
- Natural flagstone - attractive but heavier, more irregular, and more expensive. Better suited to intermediate or experienced DIYers comfortable with fitting irregular shapes.
- Landscape timbers or steel edging - cost-effective border options that clearly define beds and paths without requiring masonry skills.
Call 811 Before You Dig
In the United States, dialing 811 connects you to your local utility-locating service, which will mark underground lines at no cost before your project starts. Striking a buried gas, electric, or water line is dangerous and can result in serious injury or costly repairs. This call is required by law in most states and should happen at least a few business days before any excavation.
Pair your hardscaping with thoughtful plant selection along the borders. Our article on perennials vs. annuals can help you choose plants that look good alongside your new hardscape without demanding constant replanting.
Drainage Problems Can Worsen Over Time
Hardscaping changes how water flows across your property. Improperly sloped paths or patios can direct runoff toward your home's foundation or onto a neighbor's property. Always grade surfaces so water flows away from structures, and consider your local stormwater rules before adding large impervious surfaces.
Step-by-Step: Installing Your Path, Patio, or Border
Follow the steps below in order. Skipping base preparation steps is the most common reason DIY hardscaping fails prematurely - surfaces sink, shift, or become uneven within a season or two.
What you will need
Plate Compactor (rental)
Compacts gravel or sand base layers so surfaces stay firm and level over time.
Landscape Fabric
Placed beneath gravel or stone to suppress weed growth and keep materials separate from soil.
Rubber Mallet
Seats stepping stones and pavers into sand or soil without cracking them.
Carpenter's Level
Ensures pavers and borders are even and properly sloped for drainage.
Edging Stakes or Spikes
Secures flexible plastic or metal landscape edging so it holds its shape over time.
Sketch your layout and set a realistic budget
Draw a rough overhead map of your yard on graph paper, noting existing structures, trees, and slopes. Decide which project to tackle first - a single gravel path is far more manageable than a full patio for a first-timer. Measure the area carefully and calculate approximate material quantities. For gravel paths, a depth of 2-3 inches of gravel over a 1-inch sand base is a practical starting point. Check material prices at local suppliers to build your cost estimate before purchasing anything.
For broader project planning advice, see our step-by-step home improvement planning guide. If you want to align this project with a household budget, our smart spending resource can help you find room in your finances.
Mark the area and call 811
Use stakes and string line to mark the edges of your path, patio, or border on the ground. A garden hose works well for marking curves. Once the layout looks right from multiple angles, call 811 - the national utility notification line - to have buried lines marked. This step is non-negotiable and legally required in most states.
Excavate and prepare the base
Remove sod and soil to the required depth - typically 4-5 inches total for a gravel path (accounting for a 1-inch sand base plus 3 inches of gravel) or 6-8 inches for a mortarless paver patio. Keep excavated soil for use elsewhere in the yard. Compact the exposed subgrade firmly using a hand tamper or rented plate compactor. An uncompacted base is the most common cause of sunken paths and uneven pavers over time.
Install landscape fabric and edging
Lay landscape fabric over the compacted base, overlapping seams by at least 6 inches. Cut cleanly around curves with scissors. Install your chosen border edging - flexible plastic, metal landscape edging, or natural materials like stone or timber - along the outer edges, securing it firmly with stakes driven into the ground. Good edging keeps gravel from migrating into lawn areas and gives the project a finished look.
If you plan to pair your hardscaping with low-growing plants along the edges, our guide on low-maintenance ground covers offers practical plant choices that stay tidy with minimal effort.
Lay your surface material
For gravel paths: Spread a 1-inch layer of coarse sand over the fabric first, then add and rake gravel to your desired depth (2-3 inches). Pea gravel and crushed stone are the most commonly used options; crushed stone compacts firmer underfoot. For stepping stones: Set each stone individually, pressing it firmly into a sand bed, and use a level to confirm it sits flat. For simple paver patios: Screed a 1-inch sand layer smooth, then set pavers in your chosen pattern, tapping each into place with a rubber mallet. Fill joints with polymeric sand and compact lightly.
Finish edges and inspect your work
Backfill any gaps between edging and existing lawn with soil and tamp lightly. Check that all surfaces drain away from structures. Walk the path or patio fully to feel for any unstable stones or uneven spots; adjust them now while everything is still easy to access. Topdress gravel paths with a thin additional layer if needed to achieve a consistent surface depth.
Once your hardscaping is in place, consider what plantings will complement it. Our guide on native plants vs. traditional landscaping can help you select low-effort plantings suited to your region. For ideas on adding a garden feature nearby, see our raised bed gardening guide.

Author
Home & Garden Editorial Team
Home & Garden Editorial Team is the collective byline for our editorial team and contributor network. Articles published under this byline or an editorial pen name are researched, written, and reviewed according to our editorial standards for clarity, consistency, and independence before publication.
View all articles →